

The drag and drop feature allows you to easily move files or folders to a new location. You can always move a file by pressing Ctrl + X and Ctrl + V or browse through folders when you want to attach a file to an email, but the drag and drop feature is simply more convenient.
That’s why it’s very annoying when this handy feature stops working on your computer. If this happens to you, don’t worry; here are eight solutions to help you fix it.
1. Restart the Program You’re Using
If you notice you can’t drag and drop into a specific program, there is a chance the software froze. To quickly fix it, save your work and restart the program. Then, try dragging and dropping again.
2. Make Windows Forget the Last Drag and Drop
Sometimes, your computer is still processing the last drag and drop process, stopping you from initiating a new drag and drop event. Fortunately, you can easily fix it without having to restart your computer or configure your system settings.
In File Explorer, click any file or folder and hold the left button on your mouse. Then, press the Esc key. Now, try dragging and dropping again.
3. Restart File Explorer
Sometimes File Explorer encounters issues with dragging and dropping. Fortunately, you can fix this issue by restarting the service. However, doing so isn’t as easy as closing all your open File Explorer windows, as the service is always running in the background.
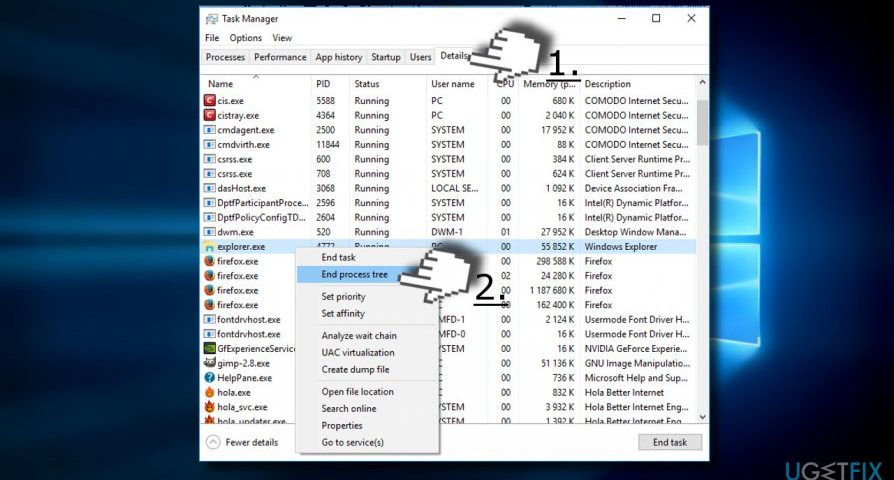
To restart File Explorer:
- Right-click the Start button and select Task Manager.
- In the Details tab, look for explorer.exe.
- Right-click it and select End task. Your desktop will vanish, but don’t worry; it’s part of the process!
- Click File > Run new task.
- Type explorer.exe and click OK to restart the process.

4. Check Windows Version
There is a chance you can’t drag and drop on your computer if you are running an outdated version of Windows 10. As such, follow these steps to check if your Windows is up to date.
- Open Settings.
- Go to Update & Security.
- From the left pane, select Windows Update.
- Click Check for updates.

Windows will search and install any available updates. Once it finishes, try to drag and drop to check if updating your system fixed the issue.
5. Check Mouse Drivers
If you can’t use your mouse to drag and drop, your mouse’s drivers may need updating. This goes double if you’re using a laptop and you can still drag and drop using the trackpad.
- Right-click the Start button and select Device Manager.
- Extend the Mice and other pointing devices menu.
- Right-click your mouse driver and select Update driver.
- Select Search automatically for drivers and Windows will find and install any available driver updates.

Additionally, if you are using a third-party app to customize your mouse control settings, it could interfere with how it usually works. Take a look at the app settings and see if there is anything that could stop your mouse from working properly.
If it’s an app that you use for gaming, stop it from running at startup. Open Task Manager, go to Startup, select the app and click Disable.
6. Run the SFC and DISM Scans
SFC will check all your system files for any damaged or corrupted system files. Once it detects such files, it will automatically replace them. Also, the System File Checker will provide you with detailed information about the scan that you can access in its log file.
Follow these steps to run an SFC scan:
- Input command prompt in the Start menu search bar and select Run as administrator.
- Type sfc /scannow.
- Press Enter to launch the scan.

Do not close the Command Prompt window until the scan is not complete. The length of the scan will depend on your total system resources.
If the System File Checker detects any corrupted or damaged system files it will display the Windows Resource Protection found corrupt files and successfully repaired them message. If it doesn’t find corrupted files, you will see the Windows Resource Protection did not find any integrity violations message.
If the SFC scan didn’t fix the problem, you should try running a DISM scan. Open Command Prompt with admin rights as shown before and type in the next commands:
- Dism/Online/Cleanup-Image0/ScanHealth
- Dism/Online/Cleanup-Image/RestoreHealth
Once your system completes the scans, check if you can drag and drop.
7. Run Hardware & Devices Troubleshooter
Another tool you can use to fix your problem is the Hardware & Devices troubleshooter. In older Windows 10 versions, this tool was located in Control Panel. Now, you need to use Command Prompt to launch it. Here is how you can do it:
- Open Command Prompt with administrative rights as shown above.
- Type msdt.exe -id DeviceDiagnostic.
- Press Enter.
- Click Advanced > Apply repairs automatically.
- Click Next.

8. Edit Windows Registry
Windows Registry is one of the main components of your system as it contains Windows and software settings, driver info, and user passwords. So when you encounter an issue on your computer, it’s worth the time to take a look at the Windows Registry.
Before making any changes in Windows Registry, you should create a backup for the registry database. If an editing mistake has a negative impact on your system, you will be able to get the original settings from the backup.
Here is how you can safely edit the Windows Registry so you can get drag and drop working again:
- Input registry editor in the Start menu search bar and select Run as administrator.
- Head to Computer > HKEY_LOCAL_MACHINE > SOFTWARE > Microsoft > Windows > CurrentVersion > Policies > System.
- On the right side of the window, open EnableLUA.
- Set Base to Hexadecimal.
- Set Value data to 0 and click OK.
- Restart your computer and check if you can drag and drop.

Edit the Drag Height and Width
Registry Editor also contains the settings for the drag height and width. If the previous solution didn’t fix your issue, give this one a try.
- Open Registry Editor with administrative rights as shown above.
- Head to Computer > HKEY_CURRENT_USER > Control Panel > Desktop.
- From the right pane, open DragHeight.
- Enter a new value within the Value data field and click OK.
- Open DragWidth.
- Enter a new value within the Value field and click OK.

Note: The default value for DragWidth and DragHeight is 4. When changing it, don’t set it to an incredibly high value such as 2000 because it might lead to new problems.
Easy Fixes for the Drag and Drop Feature
Hopefully, one of the listed solutions fixed the drag and drop function on your computer. If none of the solutions worked, there is a chance your mouse is broken. In this case, you can shop for a new one.


