
How to Use AirTags: A Complete Guide
8 mayo, 2021
Microsoft elimina un controlador AMD con errores de la actualización de Windows
9 mayo, 2021How to Use the Device Manager to Troubleshoot Windows 10
Cómo usar el Administrador de dispositivos para solucionar problemas de Windows 10
It’s helpful to think of the Windows Device Manager as a real-life office Manager. Just as a Manager—for the most part—isn’t directly involved in any tangible product development but is rather responsible for the management of the staff, the Device Manager plays a similar role.
In this short guide, you’ll learn everything you need to get started with the Device Manager. Let’s start with a brief introduction first.
What Is Windows Device Manager?
The Device Manager is a free troubleshooting applet developed by Microsoft. First introduced with Windows 95, it gives a complete view of all the hardware installed on a Windows computer. Apart from a view feature, the Device Manager also lets you manage and control the working of the various hardware attached to your PC.
The hardware that it lets you manage includes everything from a graphics card, audio, and cameras to hard disks, USB drives, and beyond.
Here’s a list of some of the most useful tasks you can complete with the Device Manager:
- Update the drivers
- Reinstall your drivers
- Temporarily disable them
- Scan for any hardware changes
- View driver properties and much more.
Think of the Device Manager as a place that gives you a bird’s eye of all the hardware connected to your computer. You’ll mostly need to access it when you face issues with the hardware on your computer.
How to Open the Windows Device Manager
There are two different ways that you can open the Device Manager on Windows. You can follow whatever approach that you feel most comfortable with.
Open Device Manager Using Shortcut Keys
To open the Device Manager using a keyboard shortcut, follow the steps below:
- Press Windows Key + X to open the Power User menu.
- From there, find and click on the Device Manager option.
Another way to open the Device Manager is through a simple search in the Windows Start menu search bar. To do that, type devmgmt.msc in the Start menu search bar, and click on the best result, i.e., Device Manager.
From here, you can explore the Device Manager for any problems that you might be facing or check the status of drivers and see if everything is working smoothly.

How to Use the Windows Device Manager
As we have discussed above, Windows Device Manager lists all the installed or connected hardware and drives on your PC. By previewing the displayed list, it becomes easy to find what you’re looking for.
You can see all the driver problems associated with your Windows computer with its help. For instance, if there’s trouble with your system hardware, such as a missing driver, an accidentally disabled driver, a shortage of CPU resources, and the like, you can try and resolve it from the Device Manager itself.
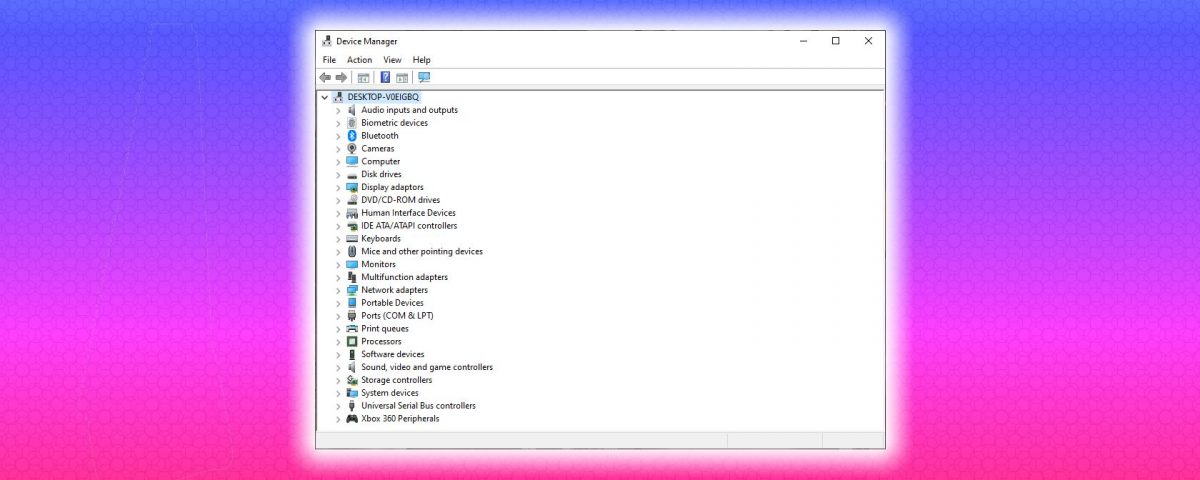
As you can see from the image below, all the drivers are neatly categorized by their type. This makes it easy to navigate the app and helps you deal with driver issues effectively. For example, if you face a problem with one of your audio drivers, you can simply expand the Audio inputs and outputs section and check the specific driver that’s giving you the trouble.

Note that you can also change the display or arrangement of the devices from the View tab. Click on View and choose the arrangement of drivers that you would prefer instead.
Another interesting fact is that some drivers are hidden by default. To check them, click on View and select the Show hidden devices option.
How to Update a Driver With Device Manager
The Device Manager also comes in handy when you have to update an outdated driver, especially when Windows Update stops working.
First, open the Windows Device Manager, then follow the steps:
- Click on the hardware category that you want to update. (Let’s say you want to update one of your System device’s drivers, then click on System device and select a particular driver.)
- Right-click on the driver and select Update driver.
- Now select Search automatically for drivers and let the process complete.
The Device Manager will then search for the latest driver update on your PC and install it. But if it finds that you already have the most updated version of the driver, it will give you that message instead. In our case, the device was already running the latest version, as you can see below.

But if you’re positive that the driver is not up-to-date, then you can download it directly from the manufacturer’s website and install it with Device Manager.
If you want to go down this route, jump ahead to the second-last section of this guide, explaining how to deal with a corrupt driver.
Checking the Status of Installed Hardware
It’s not a bad idea to check out the Device Manager if your computer hardware is acting wacky or out of character.
After you’ve opened the Device Manager, expand the device type that you want to check out. From there, right-click on a particular driver and open the Properties section.
Then from the General tab in the dialogue box, look at the Device Status box to confirm its status. If the device status is “working properly,” then the hardware is not experiencing any issues due to driver failure, and you can look for other causes.

However, if there’s an issue with the component, you’ll see a description or error code associated with the problem. The description or error code in itself, though, won’t give you any information on how to fix the driver itself. Head to the next section for that.
Dealing With a Corrupted Driver Using the Device Manager
Just as there’s not a single way to handle the complex affairs of life, Windows 10 also has several methods to fix your corrupted device drivers. One such method is through the Device Manager.
If a device driver has become corrupted, you can use the Windows Device Manager to uninstall the faulty device and then reinstall a clean version.
- Open the Device Manager, right-click on corrupted driver and select Uninstall device.
- Now, reboot your PC.
After rebooting, Windows will automatically detect your system configuration, find and reinstall the removed drivers. However, if the reinstallation doesn’t happen, you’ll have to do it manually through the Device Manager.
Download the driver manually from your hardware manufacturer online. If you get a ZIP file, extract it, and then follow the steps below:
- Open the Device Manager, right-click on the specific driver.
- Now click on Update driver > Browse my computer for drivers.

Select the driver file that you downloaded from the manufacturer’s website and click on Next. The most up-to-date driver will soon be installed on your PC. Reboot your PC once for the changes to take effect.
The Windows Device Manager makes managing your Windows hardware a walk in the park. Over the years, Microsoft has introduced a slew of such tools to improve the performance of the Windows 10 operating system, which it will hopefully continue to do in the future, too.

Read Next
About The Author


