

If you’ve ever had a key on your computer keyboard break, you know how frustrating it can be. Not only is it difficult to type without all the keys working properly, but it can also be tough to find someone who can fix it for you.
Fixing broken keys on your computer keyboard can seem tricky, but it’s easier than you can imagine as it’s a quick process that doesn’t require any special tools or skills. By the end of this article, you should be able to know how to fix a broken key on a laptop or a keyboard.
Types of Keyboards and How to Fix Them

When it comes to fixing the broken keys of a keyboard, one of the most important considerations before starting to diagnose the issue is to know the type of switch the keyboard uses. There are two most common types of switches used in the keyboards. These are membrane and mechanical.
Difference Between Membrane and Mechanical Switches for Keyboards
Membrane switches are the most commonly used in lower-end keyboards. They’re quieter than mechanical switches and have a softer feel, but they’re also less durable.
On the other hand, mechanical switches are the oldest switches used in high-end keyboards. They’re known for their durability and precise actuation, but they’re also louder than other types of switches.
Both membrane and mechanical keyboards have the same ways of fixing broken keys. Still, the difference is, if the membrane keyboard’s issue is not mechanical (like a broken keycap)—for example, if some liquids spilled on it—you will need to replace the entire keyboard, unlike mechanical, where you can fix them individually.
Things You’ll Need to Fix Keyboard Keys

To fix the broken key, you must remove it, clean it, and place it back. The following tools are the most useful ones:
- A small flathead screwdriver
- Tweezers
- Superglue
- A replacement key
How to Fix Keyboard Keys With Broken Keycaps
The most common type of damage is a broken keycap, which can usually be fixed by simply replacing the broken piece. But it’s important to know that if the key is too deep or the plastic has snapped, you will need to replace the entire keyboard. Below we discuss the tips on how to fix the keyboard keys that have broken keycaps.
How to Remove the Keycap From the Keyboard Switch
To safely remove the broken keycap from the keyboard, follow the steps below:

- Check if the key is actually broken or just stuck. If it’s the latter, try moving around in different positions and see what happens—this may be enough for some people. But if it’s broken, then proceed to remove it.
- To remove a broken keycap, use tweezers and gently apply pressure along its bottom edge.
- If you don’t have tweezers, you can use a screwdriver by gently prying up on one side of the keycap. You may need to wiggle it a bit to get it started.
- Lift the loose side. Then do exactly as before, but with your other hand—lifting it carefully.
- With the keycaps removed, you should be able to see some plastic plates. Gently pull on one side while pushing down with your other hand if they’re being stubborn.
That’s it! Now you know how to remove the keycap from any mechanical keyboard. Remember that most laptops don’t have user-replaceable keycaps, so check with your manufacturer beforehand.
How to Put a Key Back on a Keyboard
Now that you know how to remove a keycap, let’s talk about how to put it back on. It’s pretty simple.

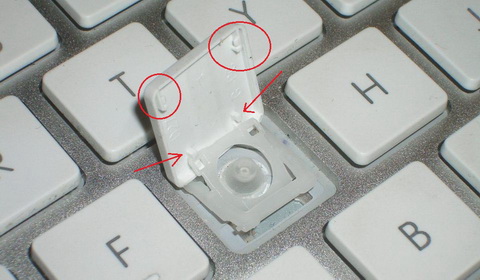
- First, line up the keycap with the switch. You’ll notice that the keycap has little plastic or metal posts on the underside.
- These posts fit into the little slots on the switch. Make sure the posts are lined up with the slots, and then gently push down on the keycap until it snaps into place.
- If you do not have a keycap replacement kit, you can also try using super glue or epoxy to fix a broken key.
- Before using superglue, clean the area around the broken key with rubbing alcohol.
- Next, apply a small amount of glue or epoxy to the plunger of the new key and press it firmly into place. Allow the glue or epoxy to dry for 24 hours before using the keyboard again.
There you go. You no longer have to worry about the broken keys on your laptop or desktop.
How to Replace the Entire Keyboard
Replacing the entire keyboard can be challenging as you’ll need to remove the screws and pry open your laptop. So, be extra careful and take your time.

- Remove the screws on your keyboard with a screwdriver and separate the keyboard from its case. Be careful not to damage the connectors on the back of the keyboard as you do this.
- Once you have removed the keyboard, you can begin installing the new one.
- Next, align the connector on your new keyboard with the case and press down until they connect.
- Once they are aligned, gently push down on the keyboard until it snaps into place. Then, insert all the screws that you removed earlier.
After replacing your keyboard, be sure to test it out before putting your computer away. Make sure that all the keys are working properly and that there are no loose screws. Once satisfied, you can put your computer back together and enjoy your new keyboard!
How to Fix Laptop Keys Not Working Because of Dirt

If the keys are not working because of accumulated dust, dirt, and other debris, you need to do the following:
- Start by gently cleaning them with a soft cloth.
- If this doesn’t work, you can try using a can of compressed air to blast away any build-up of dust and debris.
- Be sure to hold the can upright while doing this, as holding it upside down can potentially damage the keys.
As you can see, it’s way easier to fix broken keys due to dust accumulation because you don’t need to replace the keycaps or pry open your keyboard.
How to Fix Damaged Keyboard Keys Due to Liquid Spills

Liquid spills can make the keyboard keys not work temporarily or permanently. To fix laptop keys that liquid spills have damaged, you can follow these steps:
- The first step is to turn off the laptop and unplug it from any power source.
- Then, remove the battery and any other removable components.
- Next, use a dry cloth to remove any liquid from the keyboard.
- Once the keyboard is dry, you can gently pry up any sticking keys and clean underneath them with a cotton swab dipped in rubbing alcohol.
- Finally, reassemble the laptop and test the keys to see if they are working properly.
However, If the liquid spills on any key of the membrane keyboard, you will need to replace the entire keyboard. But if it is a mechanical keyboard, you can replace the individual keys by following the steps we discussed earlier. So, it’s always important to be careful when liquids are near your keyboard.
Fix Your Broken Keyboard With Ease
As you can see, there are several ways to try and fix the broken keys on a laptop or desktop keyboard. However, the steps you need to follow may vary depending on how it got damaged in the first place. If it’s dust accumulation, all you need to do is clean it up or blow compressed air.
But if it’s more serious, you’ll need the right replacement part to get the job done, whether that’s a broken keycap or a damaged PCB. Note that if the issue isn’t limited to specific keys and your keyboard isn’t working altogether, it could always be a software-related issue or, worse, the result of a faulty motherboard.


