


Windows 10 is pretty easy to get started with, but for the best experience, there are some important things to do after installing Windows. Doing these takes a bit of time, but sets you up for a smoother time down the road.
Let’s look at the first things you should do after installing Windows 10. These are most important when installing it for the first time, but are worth checking after installing a major feature update or reinstalling a fresh copy of Windows, too.
1. Run Windows Update and Configure Update Settings
Even though you just installed Windows 10, chances are that some recent updates are pending. You should install these right away to make sure you have the latest features and security patches.
To check for Windows updates, open the Settings app (using the Win + I shortcut or the icon on the Start menu) and go to Update & Security > Windows Update.
On this page, click Check for updates and give it some time. After a few moments, it will begin to download and install updates, if needed. If there are any that require a restart, you’ll see a prompt to do so.
You’ll also see a message here if there are any feature updates to Windows 10 ready, which are the larger revisions released roughly twice per year.

Windows Update runs automatically in Windows 10. While this means less manual work on your part, it can also be a pain if it interrupts you. Learn how to manage Windows Update to make it work smoothly in the background.
This is an important thing to do as soon as you install Windows 10—you don’t want a poorly-timed update to mess up what you’re doing.
2. Make Sure Windows Is Activated
Unlike older versions of Windows, Microsoft makes it easy to install Windows 10 on your PC without a valid license. If you didn’t enter a license key or sign into a Microsoft account that has a digital license during the setup process, you should activate now. This will let you access all the functions of Windows 10.
Head to Settings > Update & Security > Activation to check if you’ve activated Windows yet. If you have, you’re all set. If not, you’ll either need to sign into your Microsoft account, or enter a license key.

Check out our guide to removing the “Activate Windows 10” watermark to learn more. You can use Windows 10 without activation, but there are a few limitations.
3. Update Your Hardware Drivers

A device driver is a piece of software that interfaces with and controls how a particular device works when connected to your system. In other words, drivers allow Windows to properly communicate with your computer’s hardware.
Drivers are usually provided by hardware manufacturers, and like most software, aren’t always perfect. Sometimes they’re buggy or don’t see updates for compatibility with the latest versions of Windows.
You don’t usually need to keep a close eye on your drivers—in most cases, if they’re working, you don’t need to risk breaking something by updating them. But when you’re first setting up Windows, installing the right drivers is an important step. Windows will install generic drivers for devices like keyboards and mice on its own, but you should know how to install other important drivers that do need semi-regular updates.
See how to find and replace outdated drivers for instructions. If you’re wondering what drivers to install after installing Windows 10, prioritize your graphics drivers, chipset drivers, and anything for special hardware that you rely on.
4. Install Essential Windows Software
Windows 10 comes with basic apps for many purposes, but a lot of the best Windows software isn’t pre-installed. We’ve written a full guide to the Windows software that everyone should install right away.
Take a look at that for our recommendations in categories like browsers, security, image editing, messaging, and more. Whether you’ve just started using or reset Windows 10, your experience will be a lot better with the right tools at your disposal.
5. Change Default Windows Settings
Windows 10’s out-of-the-box settings aren’t optimal for everyone. They’re usable, but you’ll probably have a better experience by tweaking them.
There’s a lot to manage in Windows 10’s Settings app, so let’s focus on a few key recommended changes after a Windows 10 installation.
Adjust Default Windows Apps
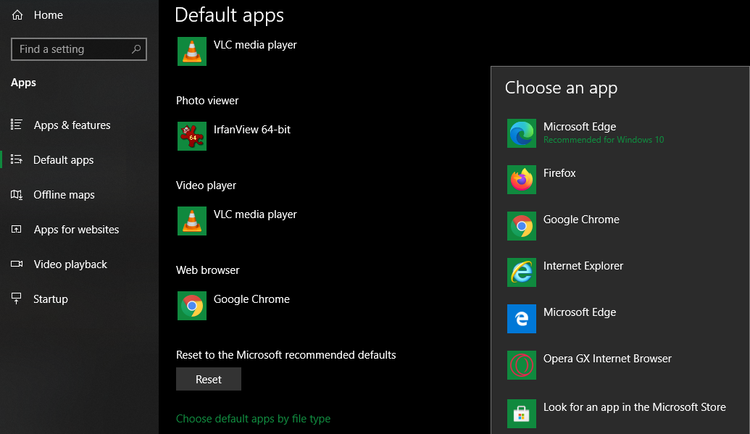
After you’ve installed your favorite apps, you should set them to run by default. To change the apps that Windows 10 uses for various purposes, perform the following:
- Head to Settings > Apps > Default apps.
- Select your preferred apps for each category, including Email, Music player, Web browser, and more.
- Below that, click on Choose default apps by file type if you’d like to associate various file types, such as PDF, DOCX, and TXT, with specific programs.
- For another view, choose Set defaults by app and pick an app to see which defaults it currently has, and which ones it can use.
See our guide to setting defaults in Windows 10 for more help with this.
Disable Unnecessary Startup Items

Many apps set themselves to run at startup, which is a waste of resources and makes your computer take much longer to boot up. After you’ve installed software, you should make sure that only approved apps run at boot.
To disable unnecessary startup items in Windows 10:
- Open the Task Manager with Ctrl + Shift + Esc, or by right-clicking on the taskbar and choosing Task Manager.
- Click More details to switch to the full view, if needed.
- Switch to the Startup tab.
- Right-click on every app you don’t want to start automatically and select Disable to prevent it from launching on startup.
Optimize Power Plan Settings

Windows 10’s power settings allow you to tweak various aspects of the operating system that involve power usage. This is important to help laptop users save battery life, but has useful performance-related settings that apply to desktop users too.
You can tweak your power plan using these steps:
- Head to Settings > System > Power & sleep.
- On the right side, choose Additional power settings to open the Power Options section of the Control Panel. If you don’t see this link on the right, increase the Settings window’s horizontal size and it should appear.
- You’ll see several plans to choose from, including Balanced, Power Saver, and High performance. Select the plan you want, then click Change plan settings to the right to modify it.
- Choose the amount of time that passes before the screen turns off and the computer goes to sleep. Then click Change advanced power settings for more options.
- While you can review everything here, pay special attention to the settings under the Hard disk, Sleep, Power buttons and lid, Processor power management, and Display categories.
- Click OK to save your changes.
See how to use Windows power plans to save battery on your laptop to learn more.
Tweak Privacy Settings
Windows 10 collects all sorts of information about how you use the operating system. This helps Microsoft improve the ever-evolving product, but many view it as an invasion of privacy. Thankfully, you can reduce or disable a lot of the telemetry functions.
Follow our complete guide to Windows 10 privacy settings for all you need to know.
Enable Night Light

Windows 10 includes a built-in feature that makes your screen display warmer at night. This helps reduce the blue light that keeps you awake, and makes your computer less harsh on your eyes when working late.
You can enable this by visiting Settings > System > Display. Enable the Night light slider and click Night light settings to change how it works. You can adjust the intensity of the effect and set it to run automatically from sunset to sunrise, or during certain hours of your choice.
6. Set Up a Backup Plan

You wouldn’t want to go through all these Windows setup steps only to have your computer ruined by a malware infection or dead hard drive. It’s vital to back up your data to protect it from these and other dangers.
Consult our guide to backing up and restoring data to the cloud in Windows 10 to learn easy ways to back up your computer without much hassle. We’ve also explained which files you should back up and which ones to skip.
7. Configure Microsoft Defender

Microsoft Defender, the built-in antivirus for Windows 10, is good enough for most users. As soon as you’ve installed Windows 10, it will protect your PC from all sorts of threats. But it’s smart to review how it runs and make changes to increase your computer’s resistance to threats.
Learn how to boost your security with Microsoft Defender in order to get the most out of the tool.
8. Personalize Windows 10

While it’s not important as the above steps, you should still take some time to customize your desktop after installing Windows 10. It’s amazing what a fresh wallpaper, unique mouse cursor, and other small personalization tweaks can do to make your system feel like home.
You have plenty of options for this. For some quick changes, we’ve shown how to change the look and feel of Windows 10. To get more in-depth, try some of the best tools to customize Windows 10.
After Installing Windows 10, You’re All Set
Now you don’t have to wonder what to do after installing Windows 10. We’ve looked at the essential things to do with a fresh Windows 10 installation, so your system is ready for everyday use. While you might still have to make small tweaks here and there, the initial setup is most of the work.
Meanwhile, to keep your PC running smoothly in the future, make sure you know how to keep your system clean.

Read Next
About The Author


